This is the fifth post in a series of posts to cover different aspects of Spring Boot. Please note that the entire post isn’t necessarily only written in English. In this post, I am going to cover Spring Boot’s configurations.
Configuration properties are nothing more than properties on beans in the Spring application context, that can be set from one of several property sources, including JVM system properties, command-line arguments, and environment variables.
Summary
- Spring beans can be annotated with
@ConfigurationPropertiesto enable injection of values from one of several property sources.
- Configuration properties can be set in command-line arguments, environment variables, JVM system properties, properties files, or
ymlfiles.
- Configuration properties can be used to override autoconfig settings, including the ability to specify a data-source URL and logging levels.
- Spring profiles can be used with property sources to conditionally set configuration properties based on the active profiles.
The Context
There are two different kinds of configurations in Spring, namely:
- Bean wiring: Mandate application components to be created as beans in the Spring application context, and how they should be injected into each other.
- Property injection: sets values on beans in the Spring application context.
In Spring’s XML and Java-based configuration, these two types of configurations are often declared explicitly in the same place. In Java configuration, an @Bean-annotated method is likely to both instantiate a bean and then set values to its properties.
For example, the following @Bean method declares a DataSource for an embedded H2 database:
1 |
|
The config above only applies in older version. This is completely unnecessary in Spring Boot.
If the H2 dependency is available in the runtime classpath, then Spring Boot automatically creates an appropriate DataSource bean in the Spring application context.
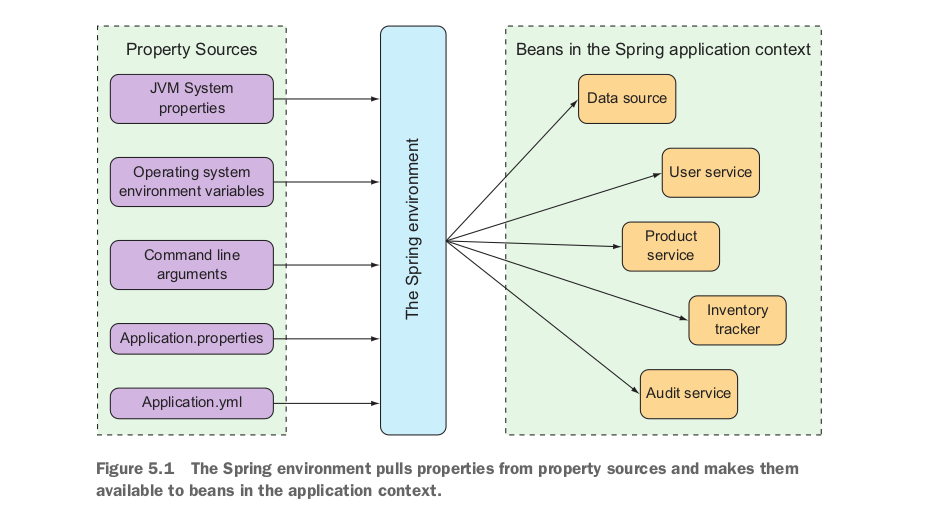
The Spring environment abstraction abstracts the origins of properties, so that beans can consume properties from Spring itself. Spring pulls from several property sources, then aggregates those properties into a single source from which Spring beans can be injected.
- JVM system properties
- OS environment variables
- Command-line arguments
- Application property configuration files (
application.yml)
Example: 4 ways of specifying a server port:
1 | # 1. application.properties |
Fine-tuning Autoconfig
Datasource
Configure an external database:
JDBC driver class is not needed. Spring can figure out from the database URL.
1 | spring: |
Spring Boot uses this connection data when autoconfiguring the Datasource bean. This bean will be pooled using Tomcat’s JDBC connection pool (CP) if it’s available on the classpath. If it’s not availbale, Spring will choose from other connection pool implementation in the classpath:
- HikariCP
- Commons DBCP 2
The way to specify database initialization scripts:
1 | spring: |
Configure datasource in JNDI, and have Spring look it up from there.
1 | # JNDI will override other datasource properties |
Embedded Server
If we set port to 0, then Spring will start on a randomly chosen available port.
1 | server.port: 0 |
This is useful when running automated integration tests, to ensure that any concurrently running tests don’t clash on a hard-coded port number.
Set up the container servlet to handle HTTPS requests.
First step, create a keystore using JDK’s keytool:
1 | $ keytool -keystore mykeys.jks -genkey -alias tomcat -keyalg RSA |
Set properties to enable HTTPS:
1 | server: |
Logging
Spring Boot configures logging via Logback, and the logging level is INFO by default.
For full control, we can create logback.xml under the root of classpath (src/main/resources).
1 | <configuration> |
Partial config in application.yml:
Specify my own path & file name, customize logging levels.
1 | logging: |
Use special property values, ${ } as the placeholder marker.
1 | greeting: |
Create Custom Config
Configuration properties are properties of beans, that have been designated to accept configurations from Spring’s environment abstraction.
Spring Boot use @ConfigurationProperties to support property injection of configuration properties. When placed on any Spring bean, it specifies that the properties of that bean can be injected from Spring environment properties. We will use an example to explain the process: Customize pagination properties.
Customize Pagination
Sample Repository & Controller:
1 | // Respository |
Add hard-coded Pagination:
1 | // Respository |
Add pageSize, so pagination is not hard-coded
1 | // Repository is the same as above; Controller is below |
@ConfigurationProperties are in fact often placed on beans, whose sole purpose in the application is to be holders of configuration data. This keeps configuration-specific details out of the controllers and other application classes.
Add to application.yml:
1 | taco.orders.pageSize: 10 |
Or export as environmental variable:
1 | $ export TACO_ORDERS_PAGESIZE=10 |
Note that in the Controller, we set pageSize = 20. But that doesn’t matter, because properties in application.yml will override the code in controller.
Another way: Extract the pagination config to a separate Entity class
1 | // Entity class, using Lombok |
Use it in Controller
1 |
|
👉 Now Order Controller is no longer responsible for handling its own configuration properties. This keeps the code in Controller neater, and allows you to reuse the properties in OrderProps in any other beans.
New Rules: Apply validation to page size. Only need to modify OrderProps Entity.
1 |
|
Declare Property Metadata
In application.yml:
1 | # pageSize is equivalent to page-size |
Warning: Spring Boot configuration annotation processor not configured.
Because there’s missing metadata about the configuration property. Therefore we add metadata in /resources/META-INF:
1 | { |
Config with Profiles
When applications are deployed to different run-time environments, usually some configuration details differ. Therefore, we can use Spring profiles . Profiles are a type of conditional configuration where different beans, configuration classes, and configuration properties are applied or ignored based on what profiles are active at runtime.
Define Profile-Specific Properties
Old way of configuring different profiles:
Use
application-{profile name}.ymlfor different profiles.
An easier way to specify profile-specific properties, in just one file:
1 | logging.level.tacos: DEBUG |
Activate Profiles
If we simply set it this way:
1 | spring.profiles.active: |
Then prod became the default profile, and we didn’t achieve the benefit of separating production-specific profiles from dev ones. Therefore, it’s better to set the active profiles with environment variables:
1 | $ export SPRING_PROFILES_ACTIVE=prod,audit |
With JAR:
1 | $ java -jar cloud.jar --spring.profiles.active=prod,audit |
If we deploy to Cloud Foundry, a profile named cloud is automatically activated. If Cloud Foundry is the production environment, make sure to specify production-specific properties under the cloud profile.
Conditionally Create Beans with Profiles
Normally, any bean declared in a Java configuration class is created regardless of which profile is active. But we can conditionally create beans with different profiles via annotations as such:
1 |
|
To exclude a profile:
1 | // Always load the data, when prod is inactive |
Add Profile to an entire configuration class:
1 |
|